
Recurring classes
How to schedule recurring classes and manage your entire series at once.
Recurring classes are the backbone of most studio schedules — the same class, same time, week after week. Arketa lets you schedule them once and manage the full series from one place.
Schedule a recurring class
When adding a class, set the schedule to Weekly and choose the days and times. You can set an end date or leave it running indefinitely.
Even an indefinite series doesn't generate every future class at once. Arketa creates sessions in a rolling window controlled by Days in advance to create class series (Settings → Class & Booking Settings → General Schedule Settings — default 90 days), and extends that window automatically each day at noon Pacific. So an open-ended series only shows classes up to that many days ahead; if upcoming classes appear to "stop," increase that setting. The window is counted from today, not from the date the series starts, so a schedule that begins several weeks out shows correspondingly fewer weeks of classes until the window catches up. Increasing the setting also applies to open-ended series you already created: the next daily run extends them out to the new horizon, so you don't need to rebuild your schedule. A series with an end date correctly stops generating on that date. General schedule settings →
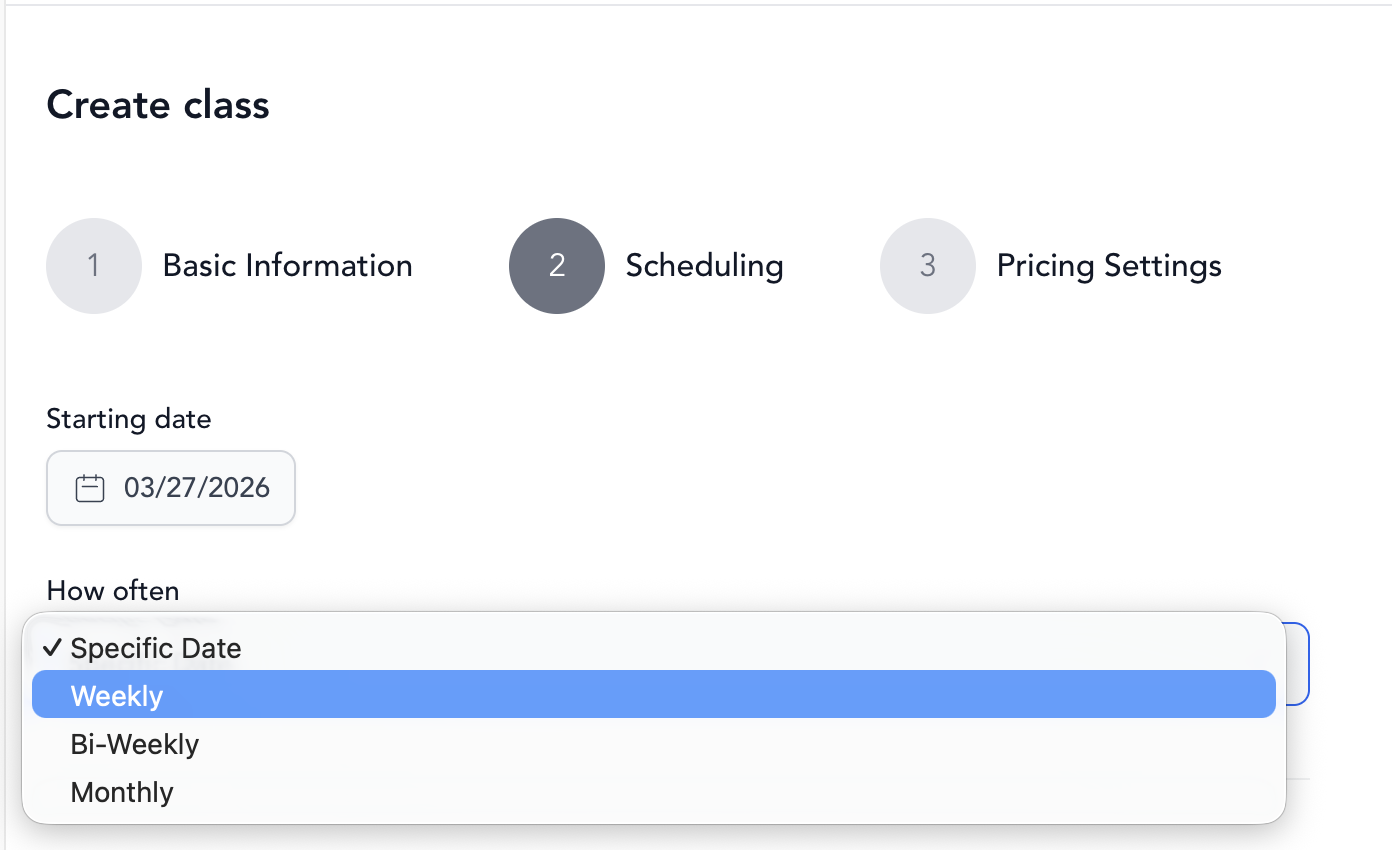
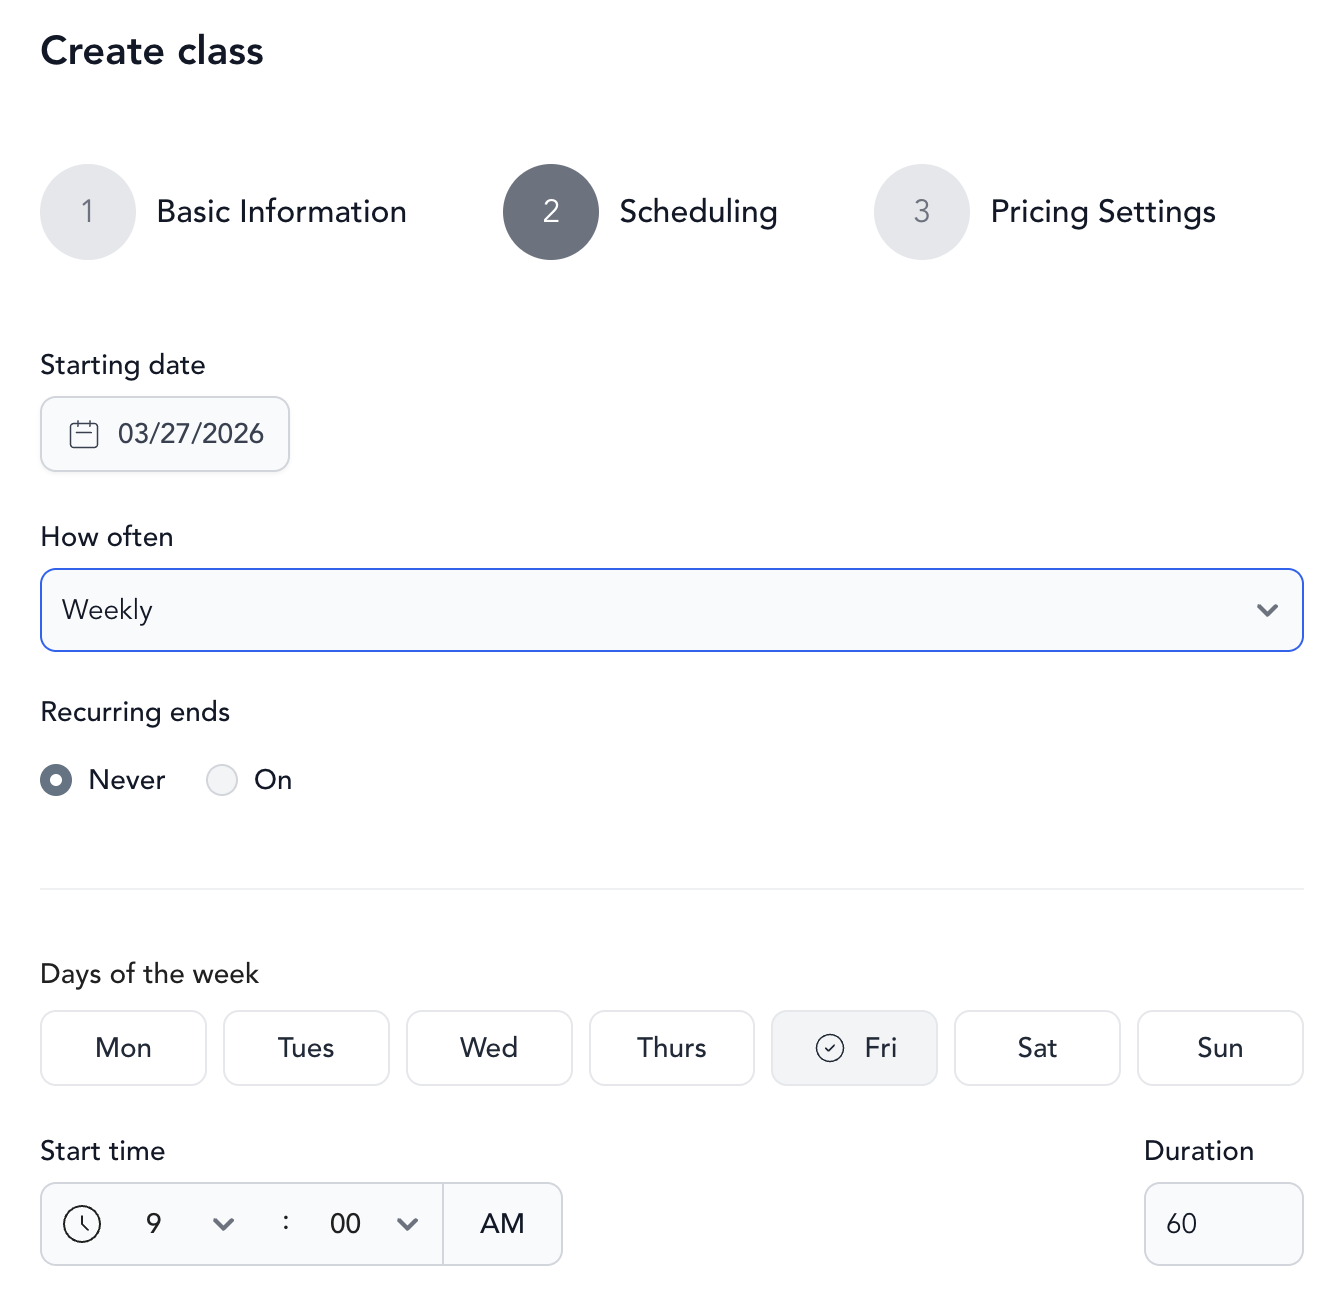
Create a separate recurring series for each day and time combination, even if two series share the same class name. For example: "Vinyasa Flow – Mon 9am" and "Vinyasa Flow – Wed 6pm" as separate series. This makes it much easier to mass-edit times or instructors for just one of them later.
View and manage a recurring series
Go to Setup → Service Types and click into any service type to see all scheduled instances:
- Active — all future scheduled classes
- Past — classes that have already occurred
- Cancelled — classes you've cancelled
Mass edit all classes in a series
To update all future instances at once:
-
Click the … menu next to the recurring series in the service type view
-
Select Edit
-
Update the fields you want to change:
- Location
- Start time
- Duration
- Instructor
-
Save changes — all future instances update automatically
Mass editing modifies all future instances of the class. If you only want to update a specific few, edit those individually from within the series view.
You can't change which days a series runs on. Editing a series updates the fields above — it can't add or remove a day of the week. So if one series covers, say, Thursday and Sunday, there's no way to drop just the Sunday classes: deleting them one at a time only removes those instances, and deleting the day removes the whole series, Thursdays included.
To split a multi-day series into separate days:
- Note who is booked into the classes on the day you want to move, so you can rebook them.
- Delete or cancel the classes on that day (use Cancel if clients are already signed up, so they're notified).
- Create a new recurring series for that day with the time and instructor you want.
This is why it's worth setting up one series per day and time from the start.
Mass cancel or delete a series
To cancel or delete all classes in a recurring series:
- In Setup → Service Types, click into the service type
- Select the recurring series
- Click Cancel selected or Delete selected
- For cancellations: choose whether to refund enrolled clients and optionally add a note. Clients will be notified by email.
- For deletions: enrolled clients are not automatically notified — use Cancel instead when clients are already signed up.
To cancel or delete specific instances (not the whole series), check the boxes next to individual classes before clicking Cancel or Delete selected.
Edit a single class in a series
- Go to Setup → Service Types → click into the service type
- Find the specific instance you want to edit
- Click the edit (pencil) icon
- Make your changes and click Save Class
This only changes that one instance — the rest of the series stays as-is.
Set an end date on an open-ended series
If you created a recurring class with no end date and now need to add one:
- Go to Setup → Service Types → click into the service type
- Select the three dots to the right of the recurring series you want to add an end date to
- Click Edit
- Set an end date and save
Allow clients to hold a recurring spot
You can let clients reserve the same spot every week across a recurring series:
- When adding or editing the class, go to Pricing Settings
- Enable Allow recurring class bookings for clients
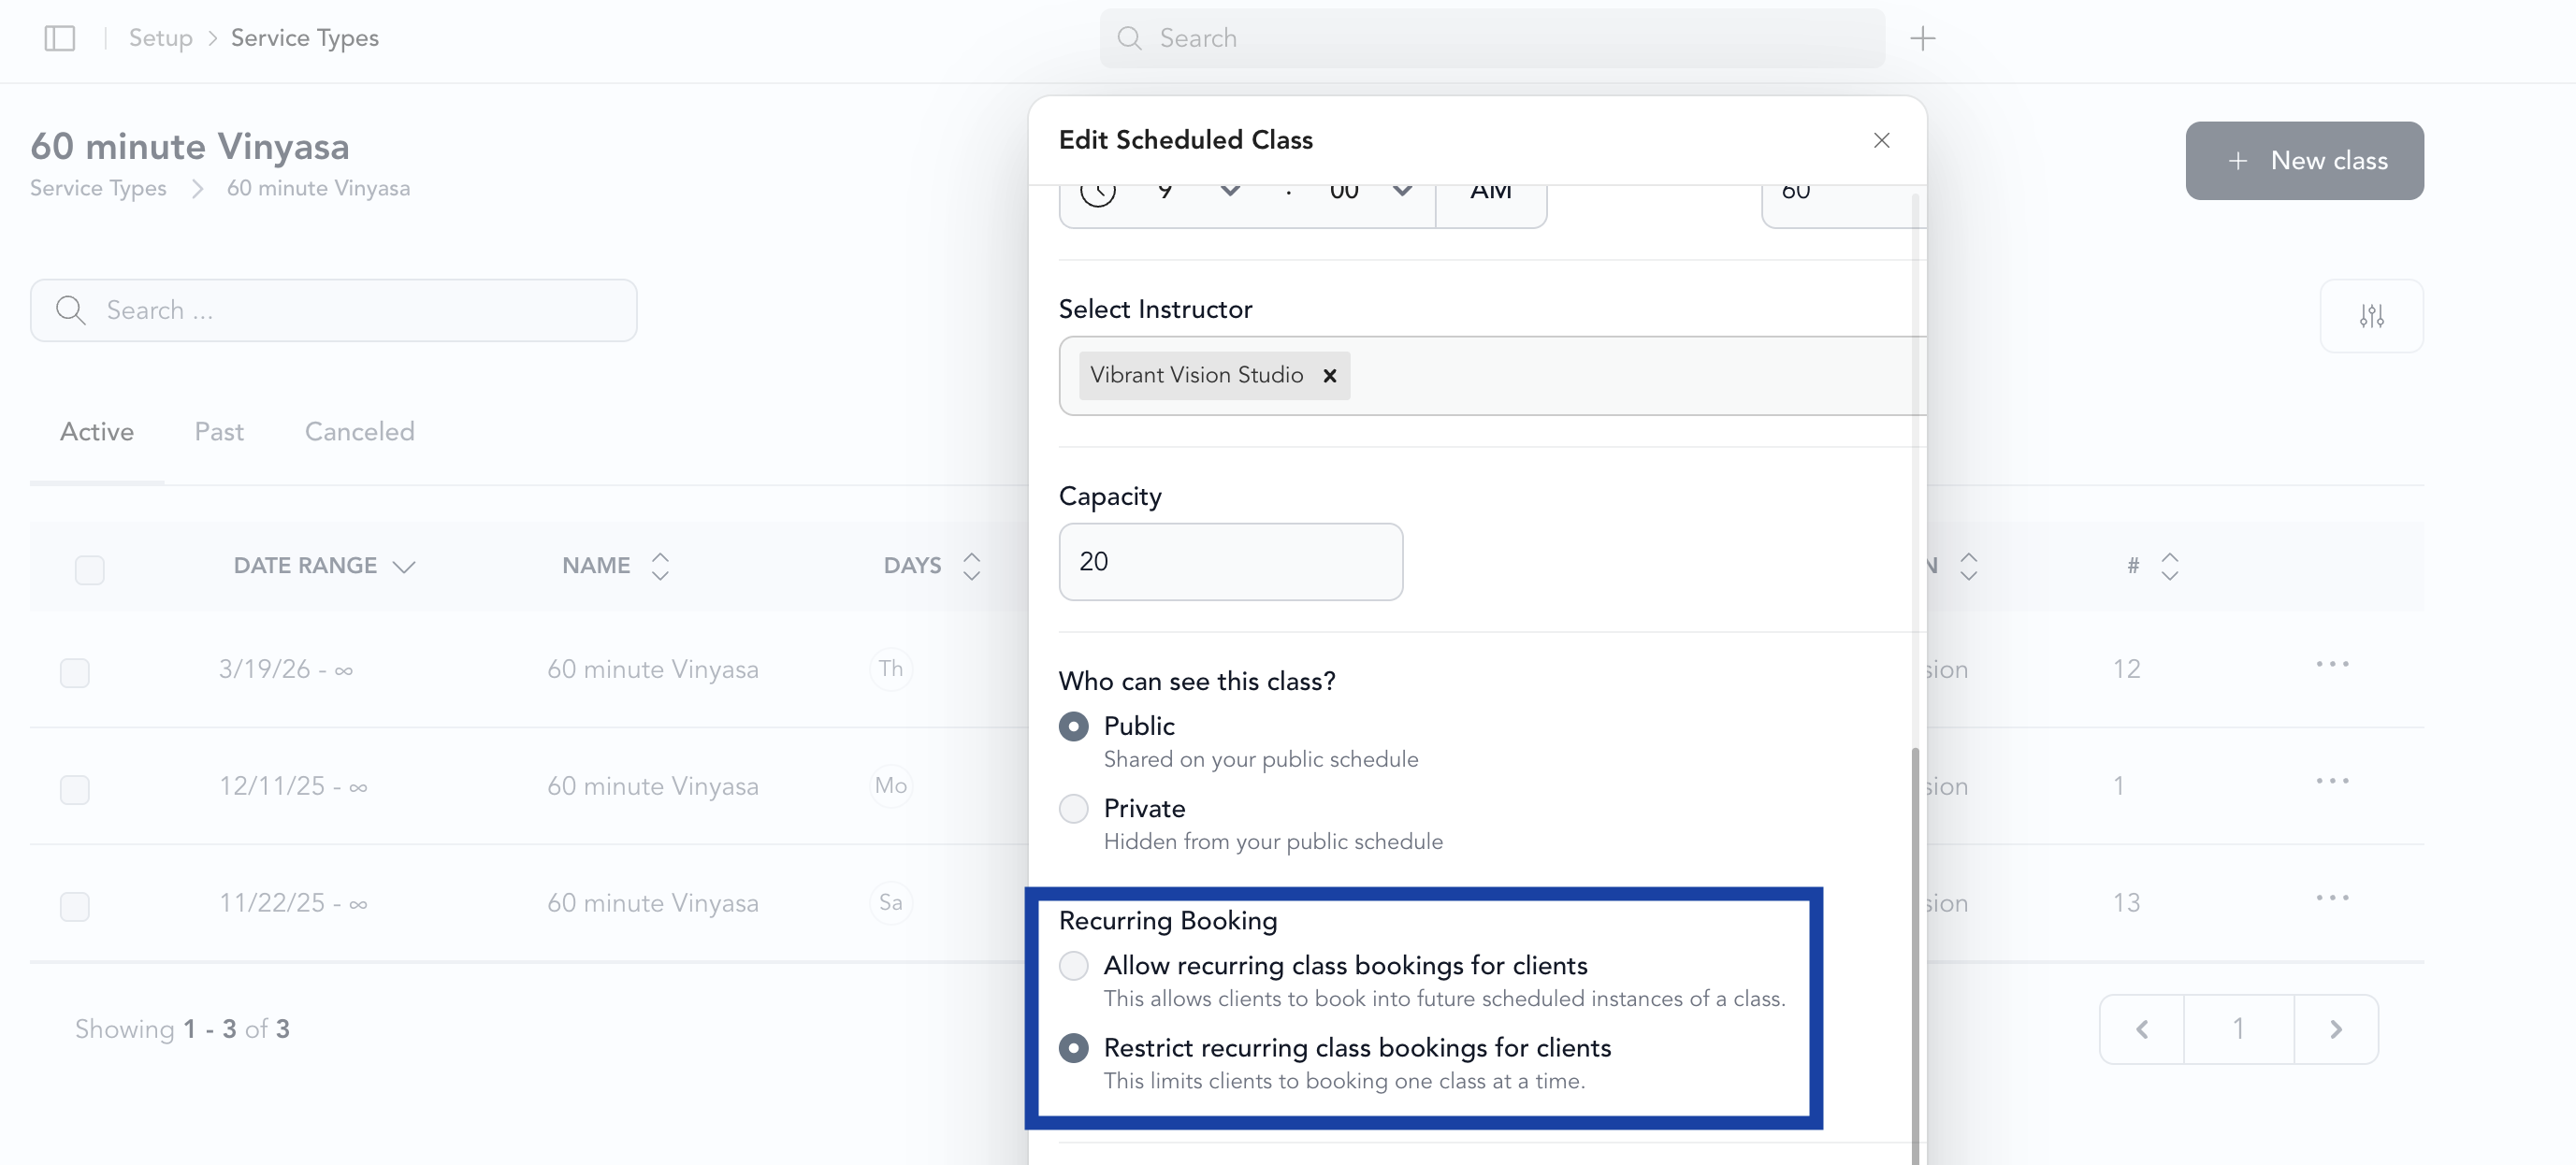
This lets clients commit to a weekly spot instead of booking week by week.
If you use recurring bookings, we strongly recommend enabling Unpaid Reservation Resolver in Settings → Business Settings. This automatically handles unpaid recurring reservations so you don't end up with a roster full of un billed bookings.
Book a client into a recurring reservation
Scheduling a recurring class sets up the series that repeats week to week. A recurring reservation is different: it enrolls one specific client into many future occurrences of that class at once, so you don't have to book them class by class.
This is a premium feature available to partners on our Studio tiers. It's admin-only — you book these reservations for your clients, and it isn't available for clients to self-serve. Live chat us if you're interested in learning more.
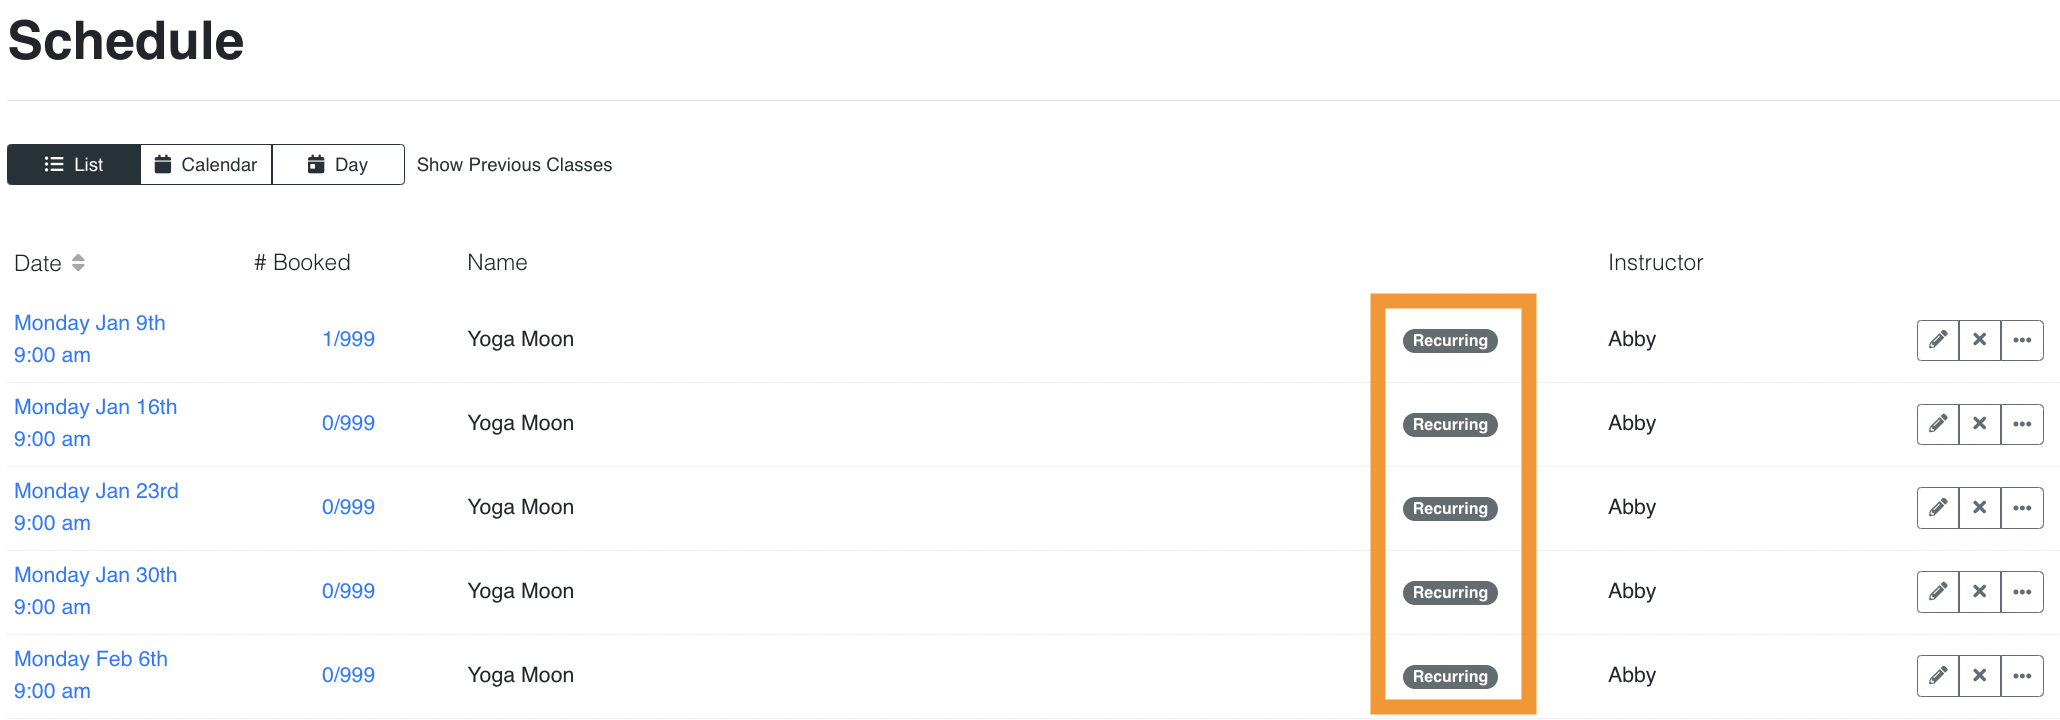
Only classes that were scheduled in bulk are eligible for recurring reservations. In the schedule list view, these classes show a Recurring tag.
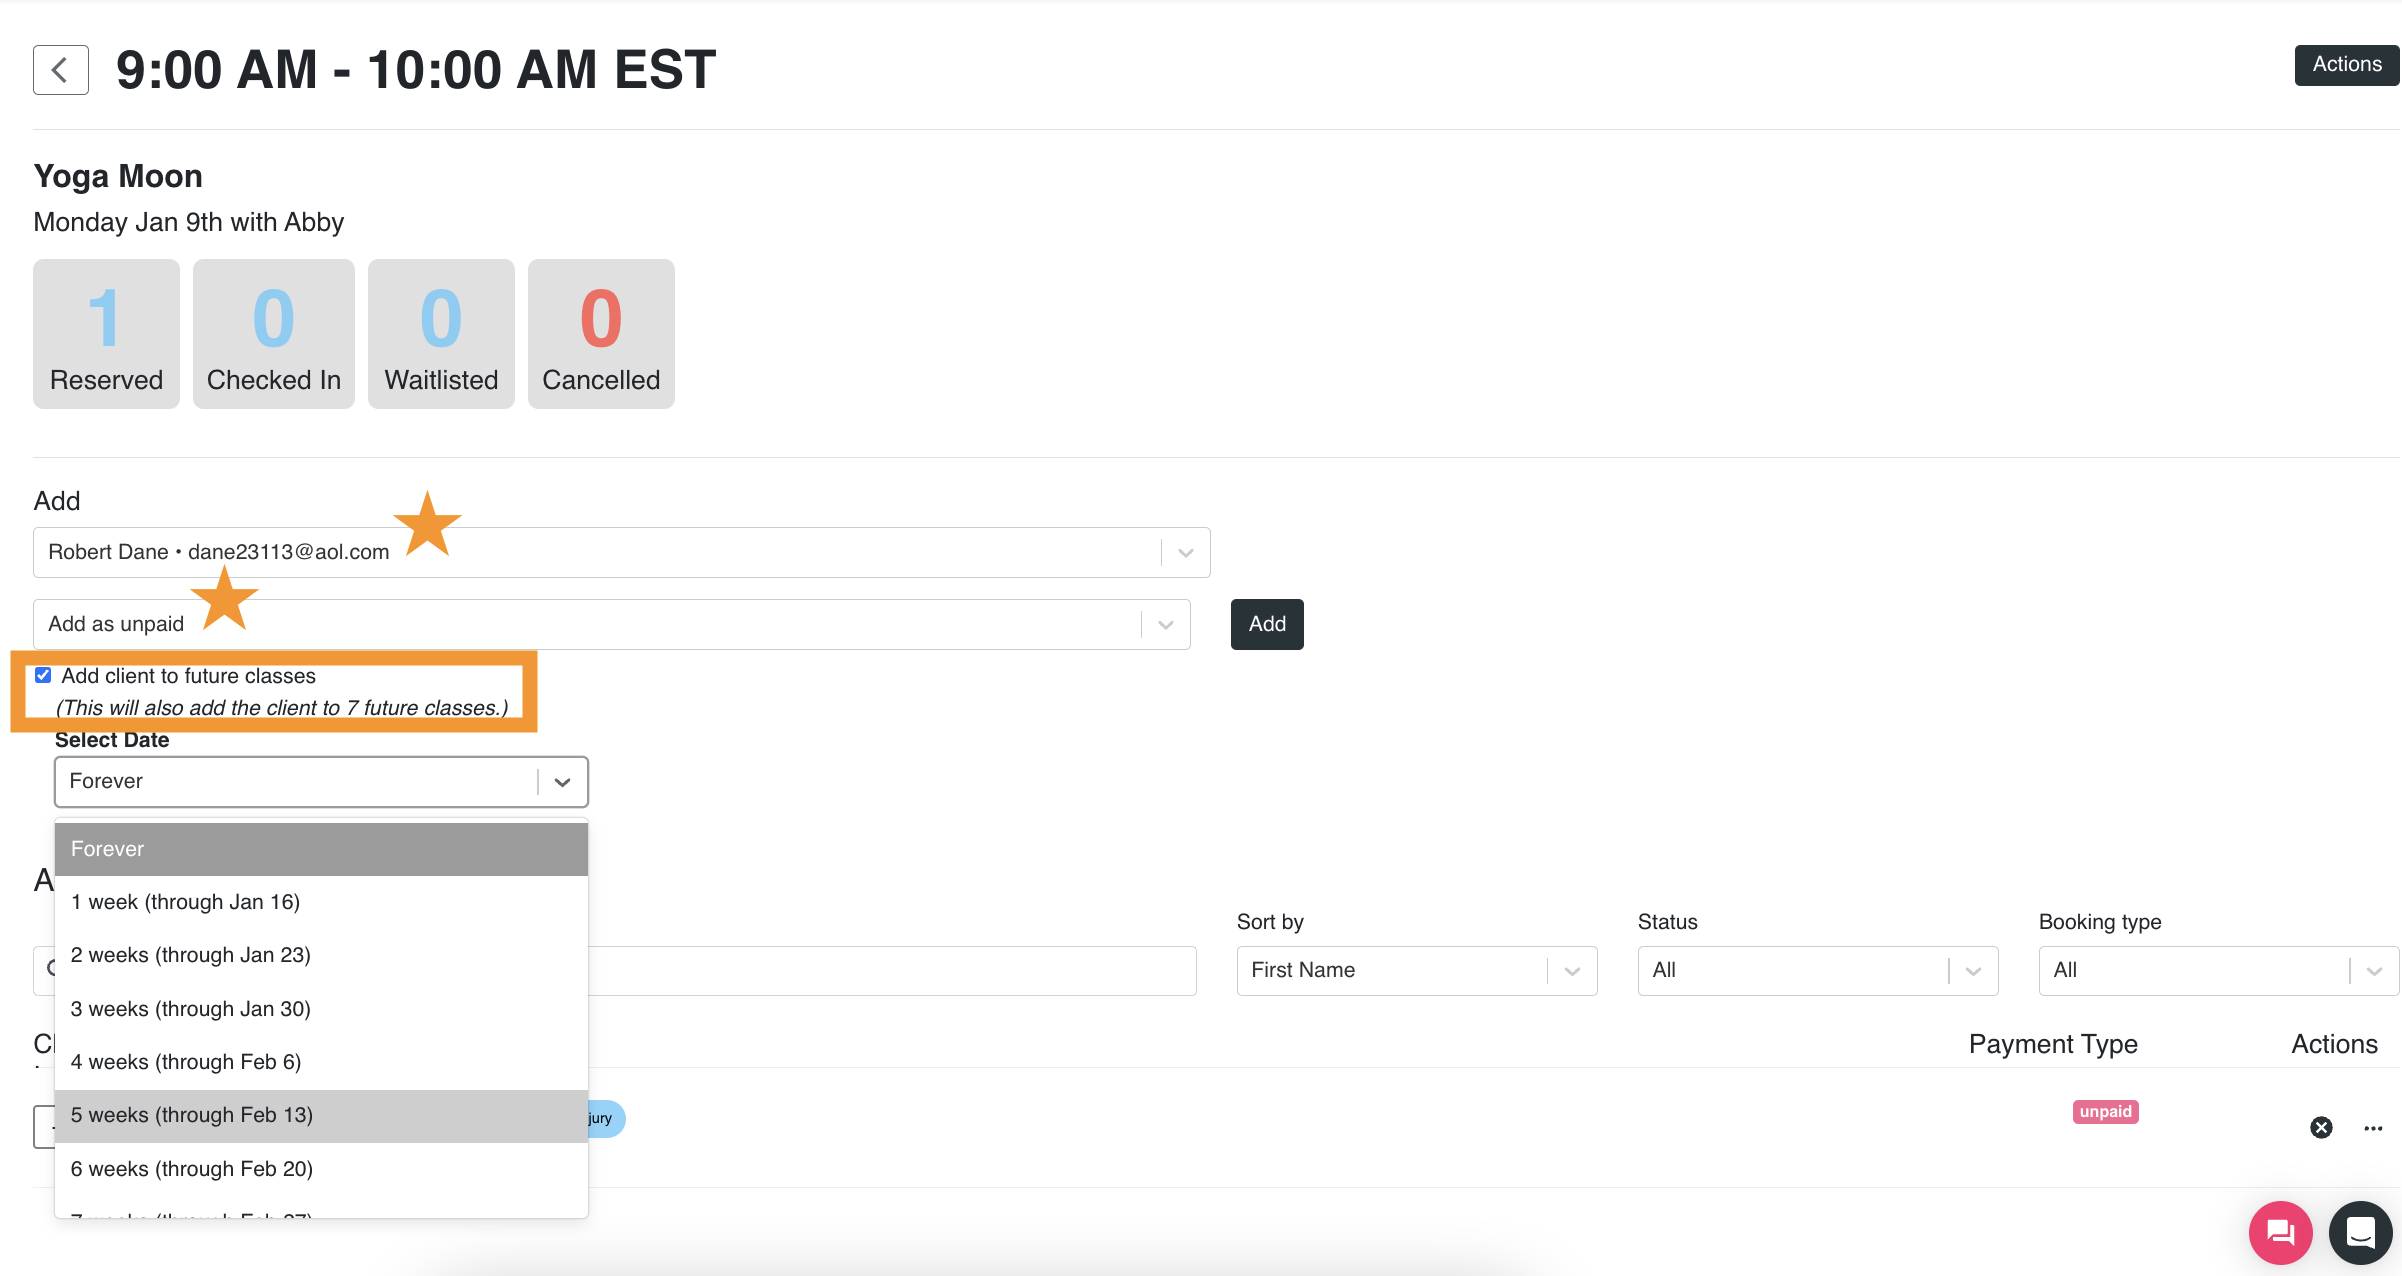
From the class check-in screen:
- Click into the class that will be the first date in the client's series
- Add the client from the dropdown, or add a new client
- Select the payment method (see Resolve payment on recurring reservations below)
- Check Add client to future classes and set the end date the bookings will run through
- Click Add to save the reservations
From the client profile:
- Open the client's profile and click Actions in the upper right
- Select Book into group class
- From the dropdown of all group class offerings, choose the class that becomes the start date of the series
- Select the payment method, check Add to Future Classes, and set how many occurrences to book
- Click Book Class
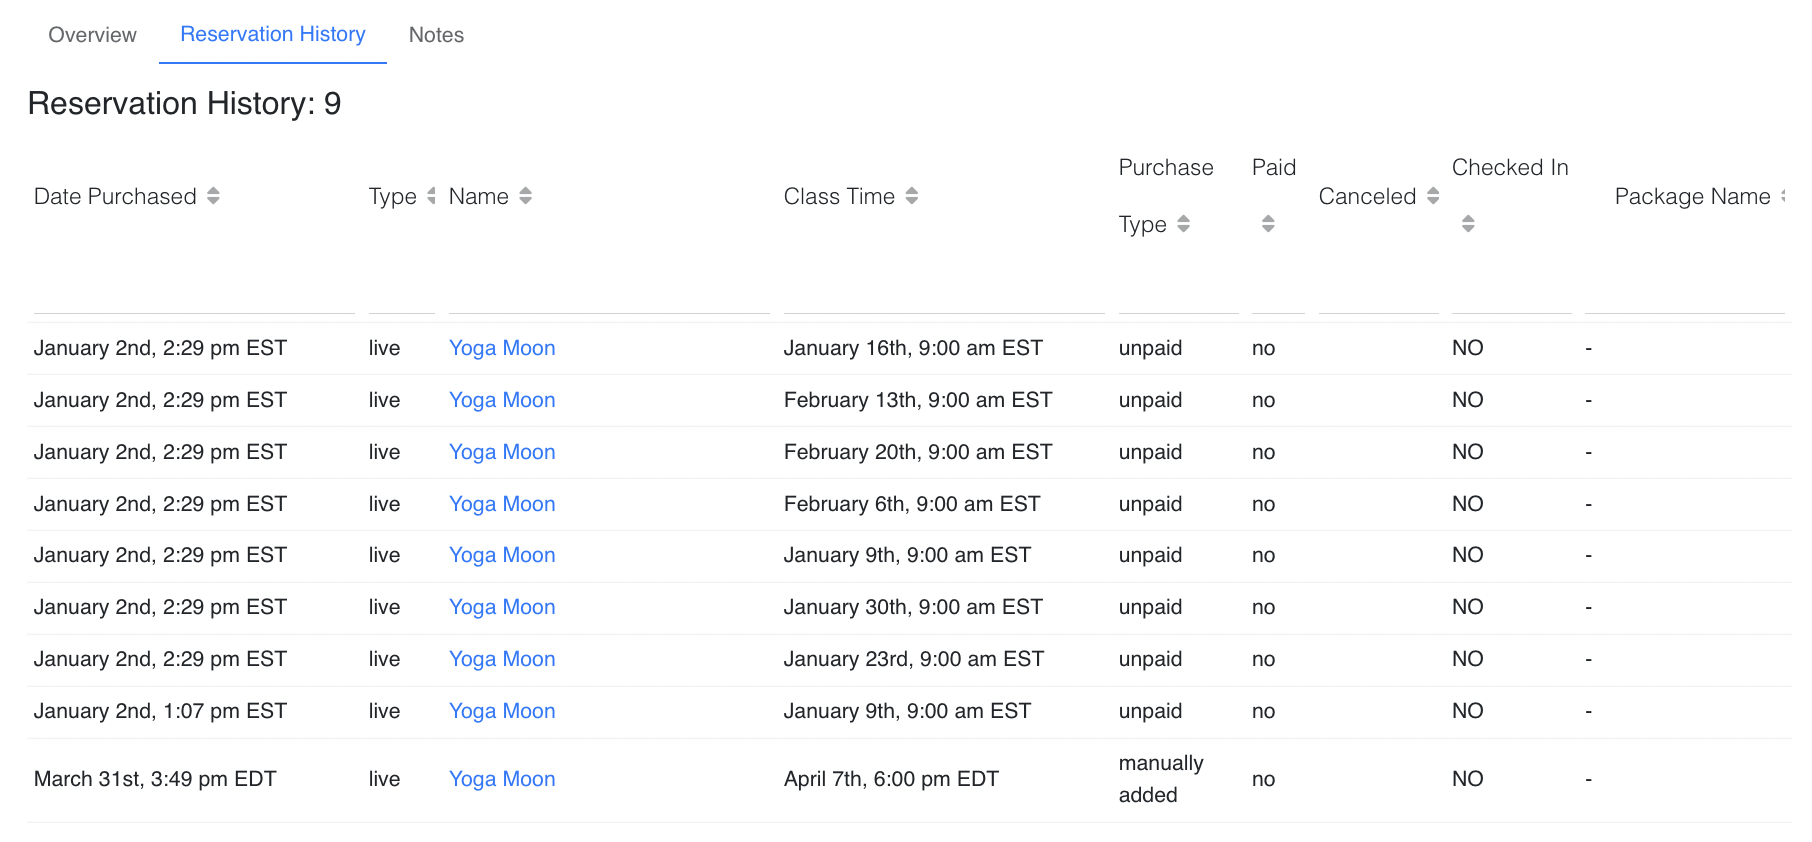
The bookings then appear in the Reservation History tab of the client's profile.
Resolve payment on recurring reservations
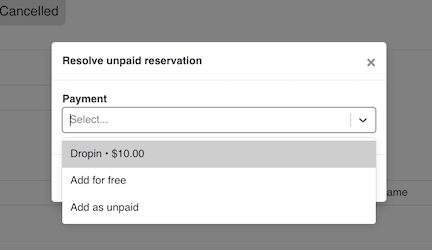
The first class can be booked as Free, Unpaid, Class Pack, or Drop-in. The payment method you choose for that first class does not automatically charge the following classes the same way — each following class stays unpaid until you resolve it, and every class's payment is handled separately.
In the class roster, recurring bookings show a Recurring tag, and any unpaid one shows an Unpaid tag, so you can see at a glance what still needs to be resolved.

To resolve payment before, during, or after class, tap the three dots to the right of the client's name under Actions, then pick a payment type. This includes class packs and any subscription already on the client's account, if it applies to that class.
This is exactly the kind of roster the Unpaid Reservation Resolver is built for. If you book recurring reservations regularly, turn it on (see the note above) so unpaid bookings are resolved automatically instead of piling up.